> For the complete documentation index, see [llms.txt](https://help.smartico.ai/welcome/llms.txt). Markdown versions of documentation pages are available by appending `.md` to page URLs; this page is available as [Markdown](https://help.smartico.ai/welcome/products/gamification-basics/custom-sections.md).
# Custom Sections
To expand the functionality of your gamification widget and enhance user engagement, Custom Sections offer versatile options. They include Missions, Badges, Tournaments, Mini-games, Match X & Quiz, Lootboxes, Store items, a Liquid Section, a Button/Link or a free HTML page, allowing you to create different sections according to your requirements.
### Create a Custom Section
Go to **Gamification → Custom sections** and click **Create**. You can create these types of Custom Sections: **HTML Page**, **Missions**, **Badges**, **Tournaments**, **Liquid Section**, **Minigames**, **Missions Lootbox**, **Match X & Quiz**, **Button / Link**, **Lootbox Weekdays**, **Lootbox Calendar Days** and **Store**. They will appear at the bottom of the left-hand navigation menu on desktop and in the hamburger menu on mobile.
A raffle gets its own custom section automatically when you create the raffle. You change that section from the raffle, not from the Custom sections list.
{% hint style="info" %}
Custom Sections should be enabled on the Label/Brand level once they are created. Please contact your Customer Success Manager to enable the custom section.
Until then, the edit page of the section shows a message such as "This section will not be visible in the Gamification widget because it is not enabled in Label settings / Widget / Sections visibility". The same message tells you when the status is not ‘Active’ or the visibility period is in the past or in the future.
{% endhint %}
{% hint style="info" %}
A custom section can be up to about 500 KB in each language: a player gets only their own language. Use links to uploaded images: a picture placed in it as base64 text may be at most 1 KB (10 KB for all of them together). See [FAQ: Other topics](https://help.smartico.ai/welcome/products/tools-and-guides/faqs/faq-other-topics).
{% endhint %}
When creating a new Custom Section you have the following options on the first step of the wizard, that are applicable for all types:
* **Internal name** - the name of the section that will appear only in the BO
* **Status** - the status of the section could be: ‘Active’, ‘Draft’, and ‘Archived’. A new section starts as ‘Draft’. Only sections in ‘Active’ status will be displayed in the Gamification Widget.
* **Visibility Period** - schedule when and for how long the Custom Section will be visible for the players. Below the dates, you can also select the week days on which the section is visible; with no day selected, it is visible every day.
* **Active hours within the day** - the custom section will be visible only during the defined time of the day. For example, everyday between 10:00 and 22:00. You can use ‘System Time (UTC)’ or the ‘User timezone’ option. The selected week days are counted in the same time zone.
* **Users who can see the custom section** - add a segment and conditions to filter who can see the custom section
The **Section setup** step of every type has a **Menu image** and a **Menu name**, the image and name of the section in the widget menu. If your label has several brands with the gamification widget, the **Branding** part lets you set another menu name and image for each brand.
### Add missions, tournaments, and mini-games to the Custom Section
There are two ways to link or remove missions, badges, tournaments, mini-games, Match X games or store items to a Custom Section. The first method is through the Custom Section template; once created and saved, an additional area will appear where you can select and connect the desired mission, badge, tournament, mini-game, Match X game or store item.
The second method is directly from the mission, tournament, or mini-game template, where you'll find an option to select and link it to your chosen Custom Section.
### HTML Custom Section
You can create a separate section and craft its content using an HTML Custom Section. For example, add an HTML section called ‘Terms & Conditions’ where you can display all the essential rules, details, and information about your gamification. When crafting an HTML page, you'll have access to additional options such as:
* **Menu image** - upload the image that will be visible in the menu
* **Menu name** - the name of the section that will be visible in the menu
* **Page content** - the HTML editor, the place where you can create your custom HTML body. On a saved section, **Edit in Vibe Studio** opens it in Vibe Studio, where the AI assistant builds or changes the page for you; **Edit in legacy editor** in the button's menu opens the code editor.
BO: HTML Page section — Page content with Edit in Vibe Studio
### Missions Custom Section
Missions Custom Section can be configured and used in various ways. For instance, you can create special missions that you want to expose only to VIP players, where the missions are scheduled for a specific date and time. The mechanics of creating a Missions Custom Section are the following:
1. Creating the Custom Section
2. Creating the Missions that will be added to the section - in the Missions template within the BO, there are 2 options related to their appearance in Custom Sections - the ‘Custom Section’ option (where you can add the Custom Section) and ‘Show mission only in custom section’ option (where you can define if this mission will be available only in the Custom Section)
3. Link the missions to the Custom Section
When crafting a custom section with missions, you'll have access to additional options such as:
* **Menu image** - upload the image that will be visible in the menu
* **Menu name** - the name of the section that will be visible in the menu
* **Tabs options** - define if the section will be split by tabs (Overview, Available, Locked, Completed, Missed) or not: ‘Show all tabs’ (default), ‘Show overview tab only’ or ‘Show Available, Locked, Completed and Missed tabs’
* **Missions shown in overview** - define which missions (Any, All missions, All except completed, All except locked, All except completed and locked) will be displayed in the Overview tab. This option is available only if you choose to display the overview tab in the ‘Tabs options’.
* **Number of missions in overview** - define how many missions will be displayed in the Overview tab (default: 10). This option is available only if you choose to display the overview tab in the ‘Tabs options’, and it is hidden when ‘All missions’ is selected.
### Tournaments Custom Section
The UI of the Tournaments Custom Section is the same as the one in the Tournaments section where there are Overview tab, My Tournaments, Started and Finished. One good example of how a Tournaments Custom Section can be used for instance is by creating different sports tournaments and adding them in a custom section called ‘World Cup Tournaments’ which will be visible only for players who are betting on sports events. The mechanics of creating a Tournaments Custom Section are the following:
1. Creating the Custom Section
2. Creating the Tournaments that will be added to the custom section - in the Tournaments template within the BO, there are 2 options related to their appearance in Custom Sections - the ‘Custom Section’ option (where you can add the Custom Section) and ‘Show tournament only in custom section’ option (where you can define if this tournament will be available only in the Custom Section)
3. Link the Tournaments to the Custom Section
### Liquid Section (Custom Levels UI)
The section type that was called Custom Levels UI is now the **Liquid Section**. With it, you also have the freedom to create a custom HTML body with the Liquid language and your players' gamification data. For example, you can build a custom levels map tailored to your preferences, showcasing the levels exactly as you desire. When crafting a Liquid Section, you'll have access to additional options such as:
* **Menu image** - upload the image that will be visible in the menu
* **Menu name** - the name of the section that will be visible in the menu
* **Select template** - start from a ready template (for example the Levels Map Template) or from a blank Custom Template
* **Entity data** - the gamification data the page can use (missions, levels, store items and more)
* **Page content** - the place where you can create your custom HTML body. It can be edited after the section is saved.
Read more in [Liquid Section](https://help.smartico.ai/welcome/products/gamification-basics/liquid-section).
### Mini-games Custom Section
Mini-games Custom Sections can be also created in various ways. For instance, you can design a Mini-Games Custom Section called ‘Valentine’s Day’ with Scratch Card, Giftbox, and Spin the Wheel games that have the Valentine's Day skin and make it visible only during Valentine's Day week. The mechanics of creating a Mini-Games Custom Section are the following:
1. Creating the Custom Section
2. Creating the Mini-Games that will be added to the custom section - in the Mini-games template within the BO, there are 2 options related to their appearance in Custom Sections - the ‘Custom Section’ option (where you can add the Custom Section) and ‘Show only in custom section’ option (where you can define if this mini-game will be available only in the Custom Section)
3. Link the Mini-games to the Custom Section
A Mini-games section shows the linked mini-games except Match X, Quiz, Bingo and Lootbox games, which have their own section types. If none of its mini-games is available to the player, the section is not shown in the menu.
Example of Mini-Games Custom Section
### Daily Lootbox Custom Section
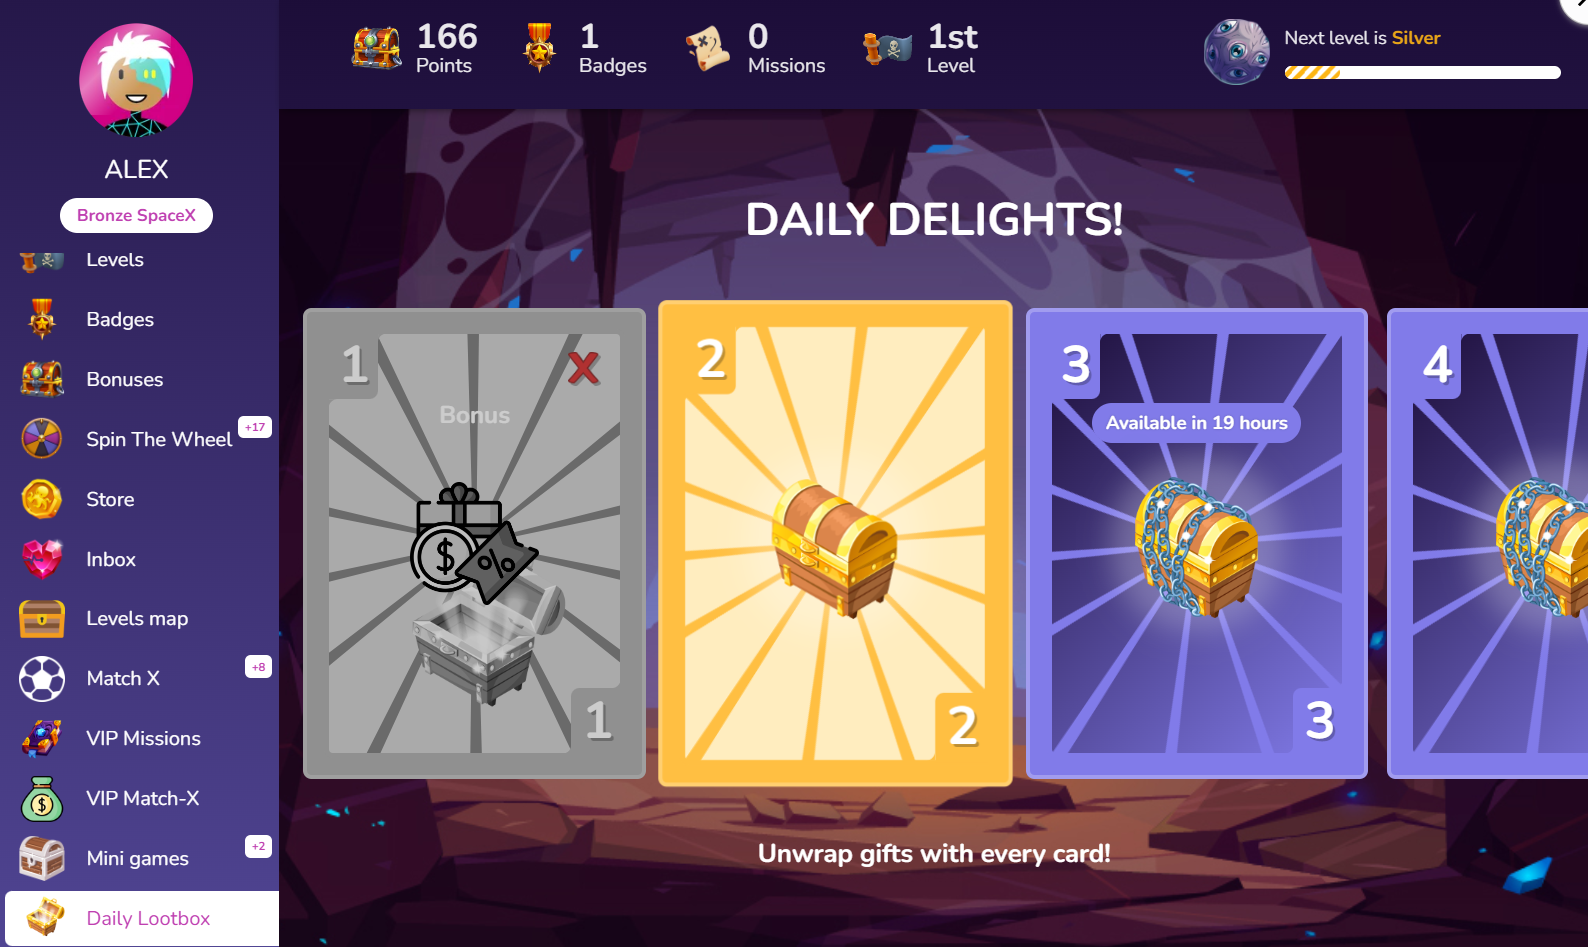
Daily Lootbox is a mini-game that offers daily rewards to players. The process is straightforward: players unveil a card each day to claim their daily reward, which could vary each day. Missing a day renders the card inactive, and players cannot reopen it. The cards are missions that are configured in a specific way.
The mechanics of creating a Daily Lootbox Custom Section are the following:
1. Create a new Daily Lootbox Custom Section (the **Missions Lootbox** type in the **Create** menu)
2. Choose the **Theme**: ‘Generic’ (default), ‘Valentines light’, ‘Valentines dark’ or ‘Soccer’. The ‘Generic’ theme also has **Skin images** and **Custom CSS**.
3. Create the missions for this Custom Section
Example of Generic Lootbox
Read more about how to create a Daily Lootbox in:
{% embed url="" %}
### Lootbox Weekdays and Lootbox Calendar Days Custom Sections
These sections show a Lootbox 2.0 game: **Lootbox Weekdays** shows Lootbox games that run on days of the week, **Lootbox Calendar Days** shows Lootbox games that run on calendar dates. When you create a Lootbox game, its custom section is created and linked for you. When you save one of these sections, its **Visibility Period** dates are copied to the linked Lootbox games; the week days and active hours are not copied. Read more in [Lootbox 2.0](https://help.smartico.ai/welcome/products/gamification-basics/lootbox-2.0).
### Match X & Quiz Custom Section
A **Match X & Quiz** section shows the Match X, Quiz and Bingo games linked to it, for example a ‘VIP Match-X’ section for your VIP players. Link the games in the section's **Match X / Quizzes** area after the first save, or from the game's own form with the **Custom section** and **Show only in custom section** options. If none of its games is available to the player, the section is not shown in the menu.
### Button/Link Custom Section
You can create a button/link that redirects users to a specific URL with a single click. For example, you can create a custom section called ‘Go to Casino’ and when the users clicks on it they will be redirected to the Casino page.
The **Button/Link** section supports deep links, custom deep links, URLs, and tags (State and Label tags). It is available under the Custom Section in the BO and has the following options:
* Internal name - visible only on the BO
* Status - the section will be visible in the gamification widget only if it is in status ‘Active’
* Visibility Period - schedule a start and end date for the appearance of the Custom section
* Users who can see the custom section - select which users can see the Custom section
* Menu image - displayed in the left menu of the gamification widget
* Menu name - displayed in the left menu of the gamification widget next to the image
* Deep link or URL - here, you can specify the deep link, URL, or tag that will redirect users when they click on the custom section
### Custom Section with Badges
Badges are digital symbols awarded to players for reaching specific milestones, completing tasks, or demonstrating particular skills or behaviors. You can create custom sections that display selected badges and control their visibility through segmentation. For example, you can show exclusive badges only to VIP players or highlight special badges that are not available in the regular Badges section.
* Internal name - visible only on the BO
* Status - the section will be visible in the gamification widget only if it is in status ‘Active’
* Visibility Period - schedule a start and end date for the appearance of the Custom section
* Users who can see the custom section - select which users can see the Custom section
* Menu image - displayed in the left menu of the gamification widget
* Menu name - displayed in the left menu of the gamification widget next to the image
* Categories - you can organize badges into multiple categories. Each badge can be assigned to a specific category, and these categories can be displayed within a custom section. When categories are enabled, badges are grouped accordingly, with each category showing only the badges assigned to it.
BO: Custom Section with Badges
### Custom Section with Store items
You can create dedicated custom sections that display selected store items independently from the main Store section. This gives you full flexibility to control visibility, segmentation, and timing of the section.\
For example, you can:
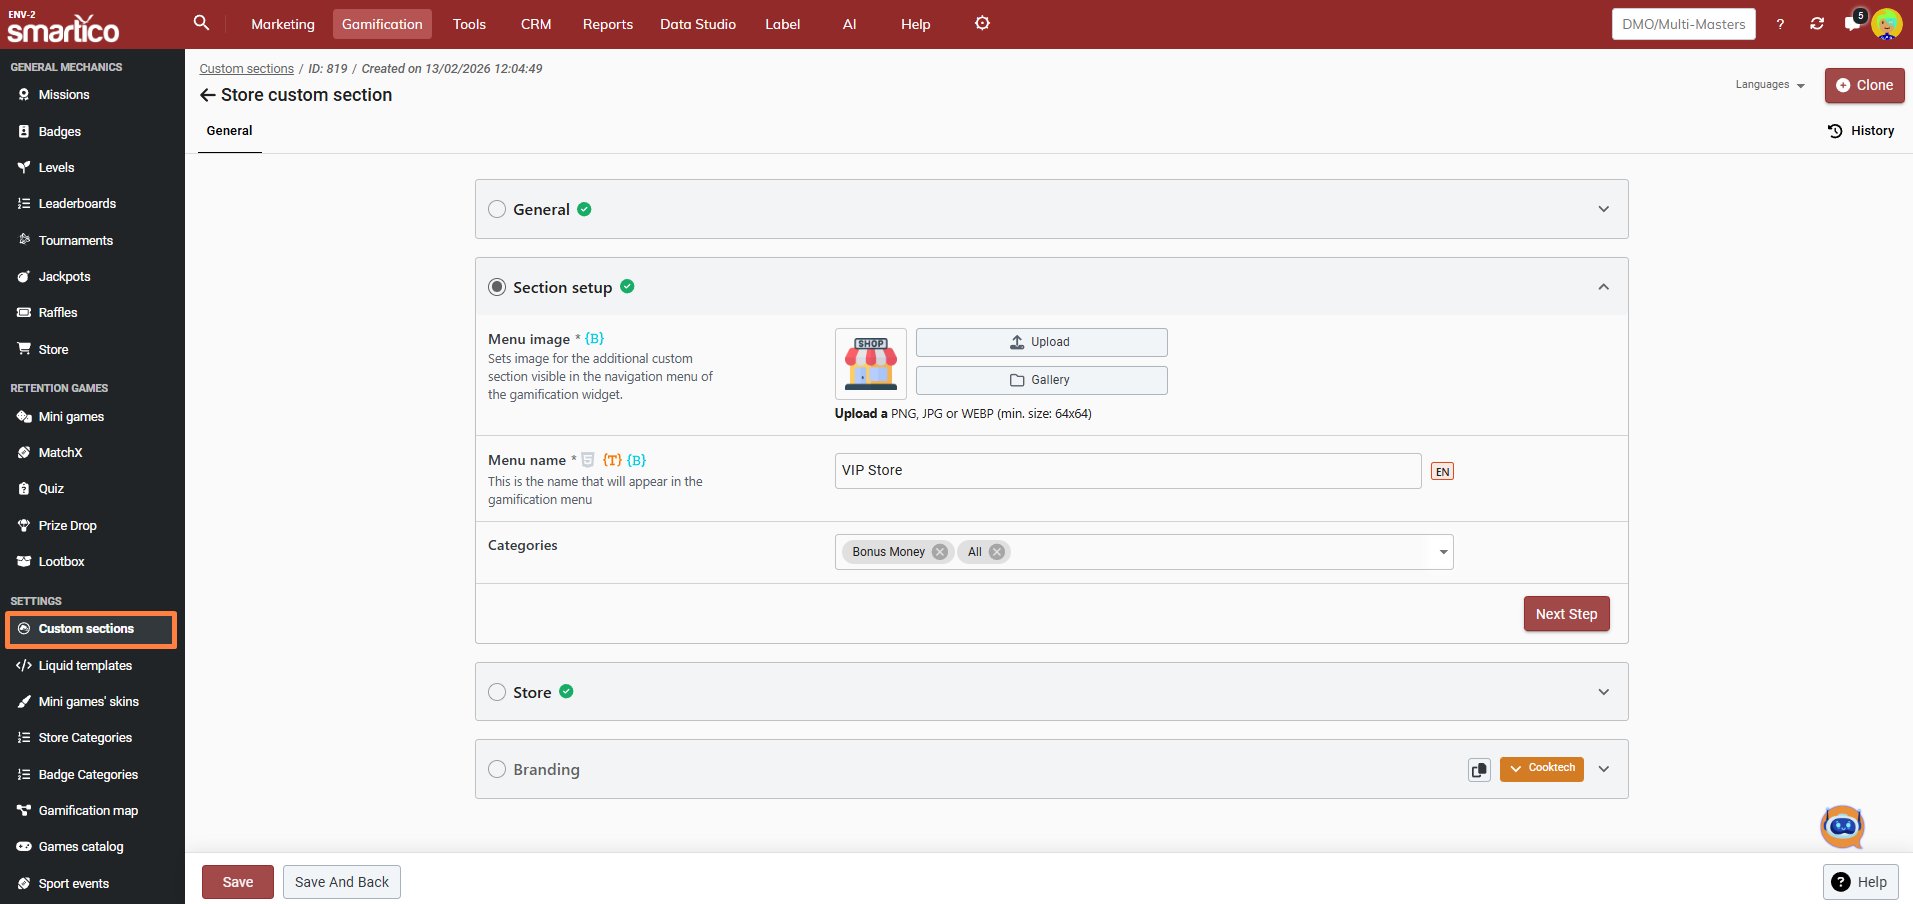
* Create a custom section that displays only Bonus store items
* Make the section visible to a specific user segment
* Schedule it to appear only during a defined time period
In **Section setup**, **Categories** limits the section to store items of these categories and groups them by category; with no category selected, all linked items are shown. Link the store items in the **Store** area after the first save, or from the store item's own form with the **Custom section** and **Show item only in custom section** options.
BO: Custom Section with Store items
---
# Agent Instructions
This documentation is published with GitBook. GitBook is the documentation platform designed so that both humans and AI agents can read, navigate, and reason over technical content effectively. Learn more at gitbook.com.
## Querying This Documentation
If you need additional information that is not directly available in this page, you can query the documentation by asking a question.
Perform an HTTP GET request on the following URL with the `ask` and `goal` query parameters:
```
GET https://help.smartico.ai/welcome/products/gamification-basics/custom-sections.md?ask=&goal=
```
`ask` is the immediate question: it should be specific, self-contained, and written in natural language.
`goal` is what the user is ultimately trying to achieve, the reason they need the answer. Sharing it helps GitBook give you a better, more relevant answer. A goal is most helpful when it describes the outcome the user wants rather than restating the question. For example, with `ask=how do I create an API token`, a goal like `automate deployments from our CI pipeline` lets GitBook tailor the answer to that use case.
The response will contain a direct answer to the question and relevant excerpts and sources from the documentation.
Use this mechanism when the answer is not explicitly present in the current page, you need clarification or additional context, or you want to retrieve related documentation sections.